We moved to Singapore! That is, husband, two kids, one dog and me.
Actually, its been about a year and a half since the incredibly intense experience of packing up our house, selling our furniture, putting stuff in storage, and flying with two children under the age of 4 halfway across the world. Did I mention, we moved the dog?
He had to be examined, tested, certified by the USDA to be ready to move. He survived the over 20 hour flight only to be quarantined upon arrival for a month!
My husband started his new job, I found one for myself, our kids started at their new school. All of which to say, I have not had the mental wits to resume writing this blog. If not for the lovely ladies who keep writing me about how to get the little red yarn eggs, I might have put this off even longer.
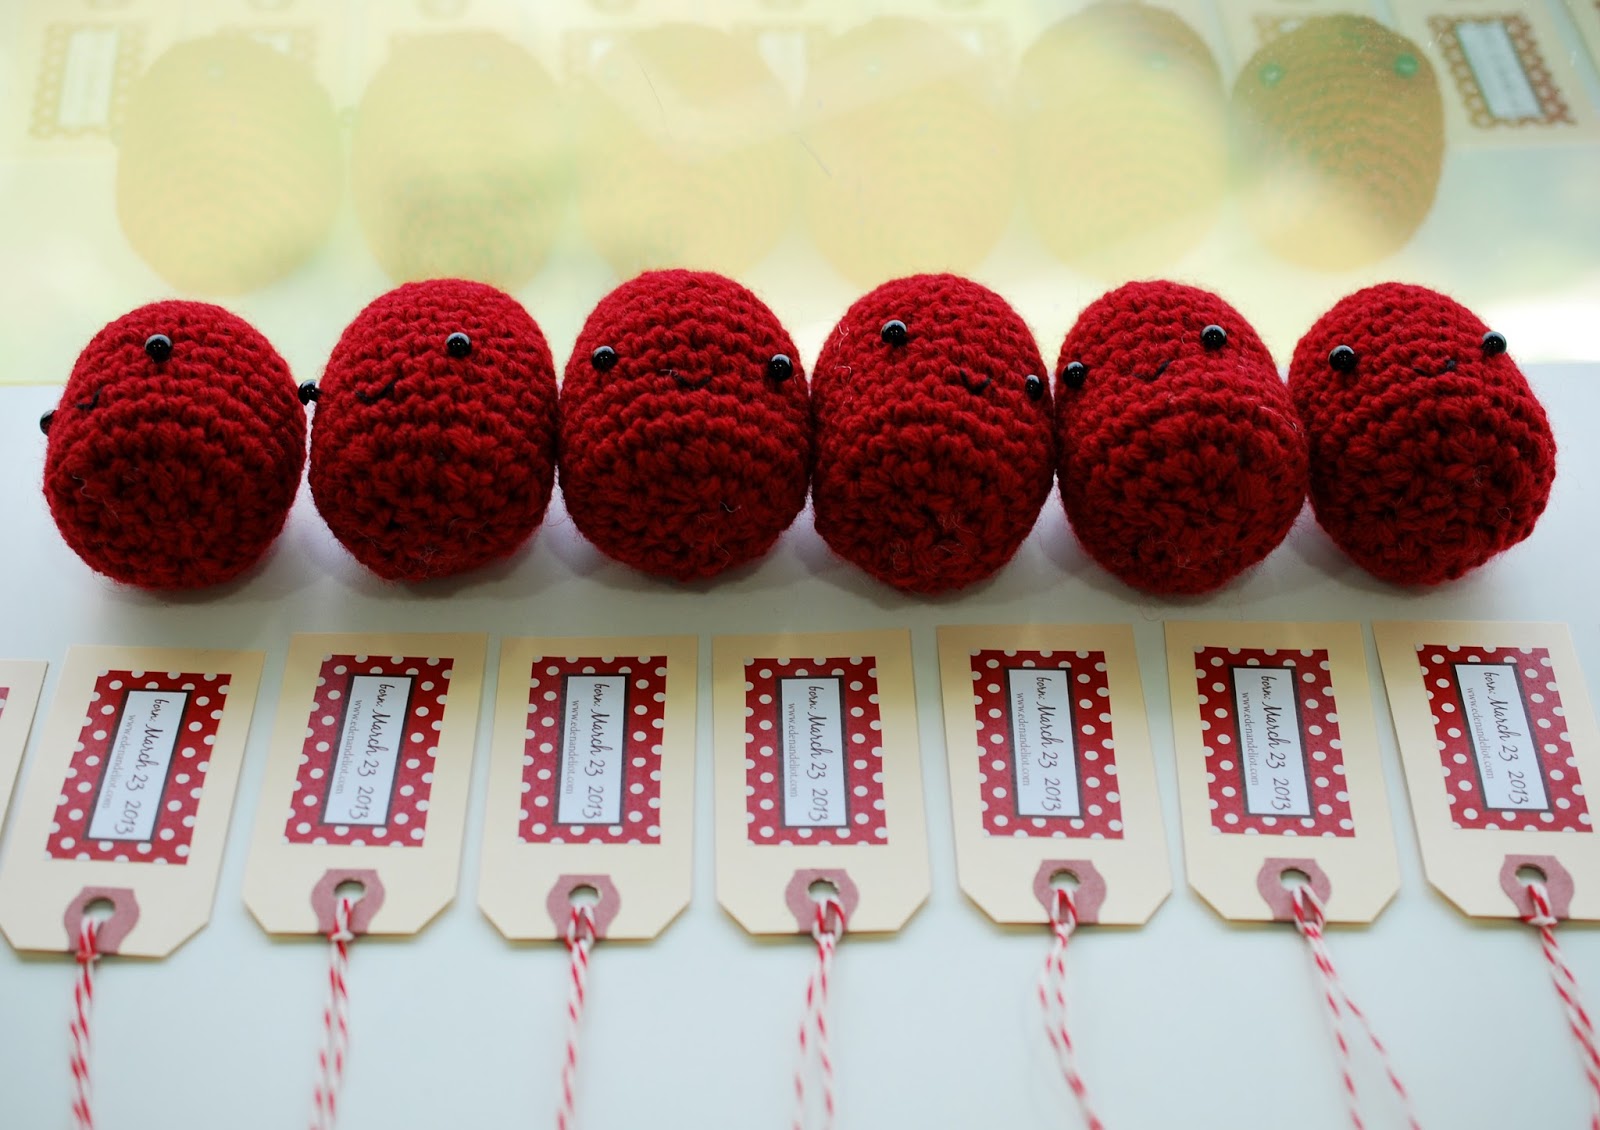
One lovely lady in particular was sweet to write me about her daughter, Emma, who is going to be celebrating her Red Egg & Ginger Party next week. I wanted to help her so I found the box that contained my yarn supplies, dusted off my patterns and made half a dozen of them. (Yes, I moved ALL my craft supplies, except the sewing machine.)
Pretty Little Labels for Red Eggs
Emma's mommy will receive this little tags in an array of pretty patterns. The back of them has her special date of arrival!
Red Eggs and Gift Tags
Can't wait for her to open up her package!
Want to order eggs for party or crochet your own? Write me or visit my etsy shop.
I'm not a very good blogger. Good bloggers write everyday or every other day, no matter what, and no matter how they feel.
I'm not a good blogger because I run out of things to say.
With the world abuzz with Japan's tsunami crisis, Libya's revolt, and now Osama bin Laden's demise, I feel like I ought not to be writing about things like making felted flowers and baby shoes. Which, truthfully, is what I'd been doing while the world churned with incredible newsworthy events.
I've also had various batches of guests in my house since mid February. All wonderful people, no doubt, but talking to people all day leaves me little time to talk to myself. Which is what blogging really is.
So excuses aside, there is no other way to get back into the groove other than just taking the plunge. Hence, here is my offering - one half of a slipper I am making for Eden, Prototype 1.0.
Its a ballet skimmer I designed for casual wear in the house (or outside, since it has faux suede bottoms.) The sole has been padded with cotton batting and lined with felted wool. The top is also felted wool - so the idea is for the foot to be completely cushed up in soft wooly comfort. Add a pretty little bit of ruffle and an elastic strap, and this little puppy is as stylish as it is practical.
I would make the other shoe, except now that I've figured out how it can be done, I might as well move on to Prototype 2.0. Oh, forgot to mention that this baby is completely hand-sewn! I dig the feel of needle and thread, kind of hynoptic and calming for the mind. Plus, the added advantage of no loud whirring to wake up the baby who has hearing like a bat.
Speaking of naps - there are SO many Mom blogs with fabulous tutorials/projects made by mothers during naptimes. I honestly don't know how that's possible?? I mean, how long do these kids nap? And why aren't these mothers running around, loading the washer, washing the dishes, folding the laundry, prepping dinner, shooing in the dog, picking up bits of lunch from the floor etc. etc...... oh, and don't forget, finally updating their Facebook status or writing a random blog post?
But I digress. Back to the subject of footwear. I'll be posting a few more examples of shoes I've made... working on a few more styles and colorways for a new launch on my etsy shop. Oh, did I mention the felted wool comes from recycled sweaters? (See first post on sweater slippers where this all started.)
I picked up my crochet hook again recently after a spell of almost a year. After my son, Eliot, was born last April, I took to learning how to crochet because of many a late night spent nursing him. The doctor had us put him on a frequent feeding schedule because of reflux, so I figured it would be less painful for me to stay awake between feeds rather than sleep for 45 minutes at a stretch.
I made a bushel full of amirugumi toys and soon developed my own patterns. When he turned a month old, I made the first Happy Little Red Egg.
Yesterday, Eliot turned one year old! Happy, happy, birthday to my dear boy.
So here are a few other companions to the first Little Red Egg to join in the celebration. I made Happy Little Pirate Egg, Chef Egg, and Cowboy Egg - all wonderful characters with alot of personality.
With Easter is just round the corner, I thought it would be fun to have plenty of yarn eggs to hunt down instead of the usual candy variety. They are easy to make and I put the patterns in my little etsy shop. My sweet husband suggested I make enough eggs to fill a bed so our kids can jump into a a giant nest full of eggs. Awesome idea but last I checked, he doesn't crochet, so nope I don't think its going to happen any time soon.
But I think if I knit a few every year, my children will have a basketful of characters by the time they're all grown up. I can tag them by the year so they can look back and see when each little egg was made. Now that, I can do. Happy, happy!
When I was little, my grandmother made me a hand-stitched quilt with a silk panel and a blanket foldover hem. I remember the quilt to this day, even though its no longer with me, because being all grown up now, I realize just how much work it took her to make it.
The silk panel on the front always felt soft and cool to the touch, perfect for the hot humid nights where I grew up. The back panel was made of a scratchy synthetic fabric, which chaffed and irritated my skin.
I remember being conflicted about whether to sleep with the silk panel right side up, which was the pretty and proper side, but which left me struggling under the scratchy side. Or to forgo looking at the pretty pattern and sleep with it side down next to my skin, letting the dull side face the world.
I don't know why I bothered to struggle with this trivial decision every night because it seems like such a odd thing for a child to obsess about. But I suppose I was that kind of a child. I wanted things to look good and feel good at the same time.
Now decades since receiving my grandmother's quilt, I set about making my first one for my baby boy, Eliot.
I'm not a quilter, and have indeed, not made one before. However, I knew I wanted it to i) it look good and also feel good next to his skin, and ii) be mostly handsewn and iii) be made from material that he will cherish as much as I did that silk panel on the quilt from my grandmother.
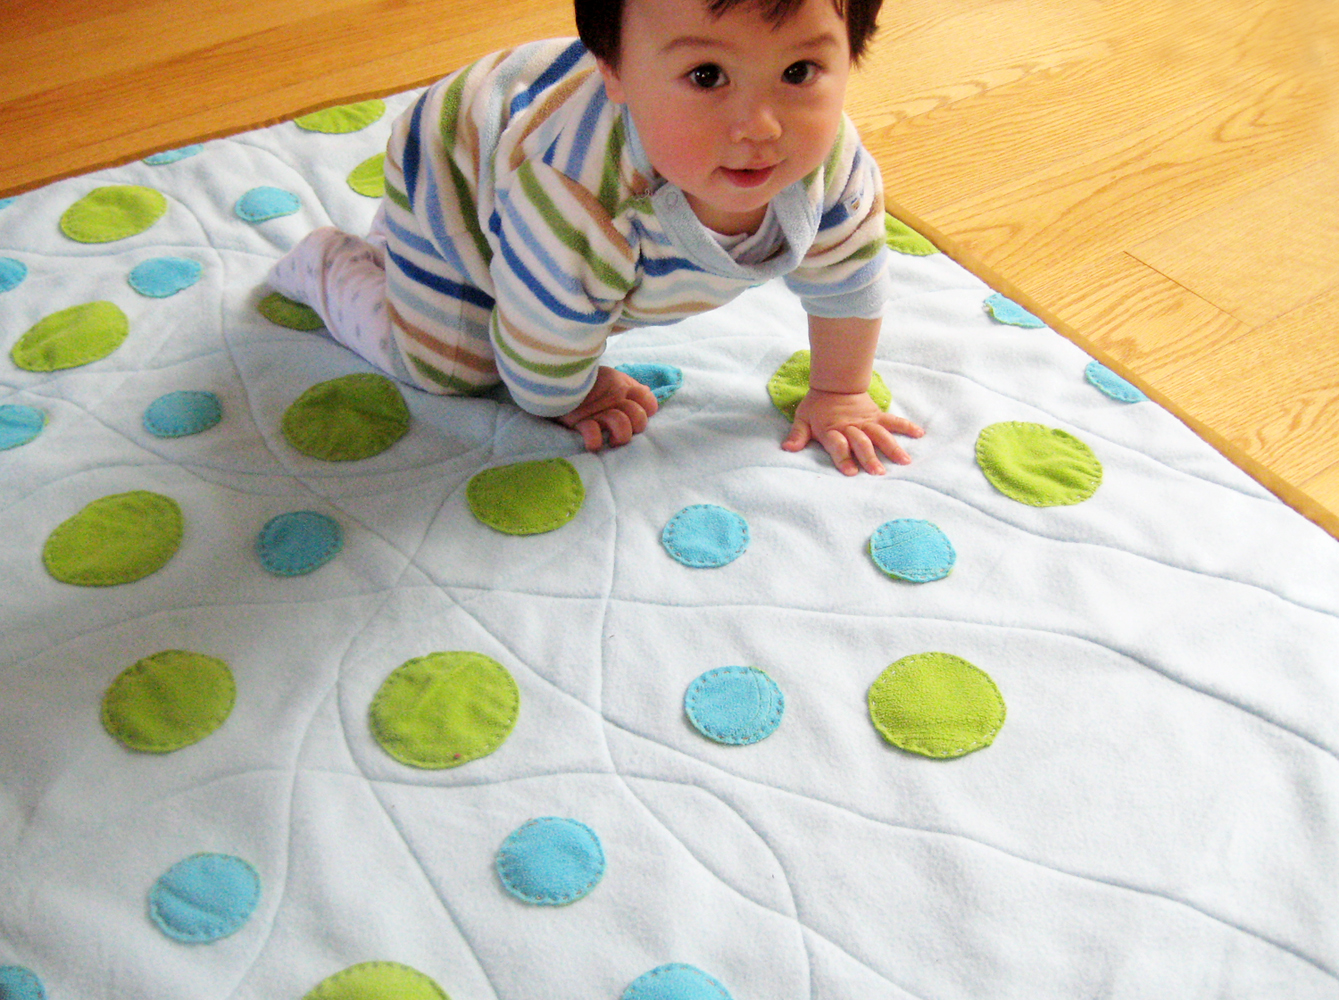
Slowly, I had been saving up particular pieces of out-grown baby clothes from both my kids, thinking that I will harvest the material someday to make new things. And this well-worn and well-loved fleece pull-over from Eden was the perfect piece to use for Eliot's quilt. It had blue circles, which is just the kind of simple motif that little ones can appreciate. And it was cuddly and soft.
I first cut out all the blue circles, and then realizing that there were too few, I traced circles onto the remaining green fleece and cut out as many as I could. The key is to use up all the material if you can - some of my favorite circles have seams in them from pockets, armholes etc, which just makes them more interesting.
Next, pin the circles on to the top panel of your quilt. I used a soft blue fleece and I arranged the circles in a free-flowing pattern, concentrating them on one edge and letting them "fade" out towards the opposite edge. Alternate between the blue and green ones in a random pattern. Placing some along the edge also makes a more dynamic composition. Just trim the ones that hang over the border so you're left with some partial circles.
Using 3 strands of embroidery floss, stitch around each circle with a straight (running) stitch. Knot off after each circle and start the next one with a fresh knot. It took many nights in the company of the late night news to finish this step.
Next, I made my quilt sandwich with needled cotton batting and a back panel of the same fleece. There are many great instructions about how to do this on other blogs - I don't know if I did it the right way. But I just put my top panel with the circles directly on top of the batting material and cut around it. I did the same with the back panel.
To make the quilt sandwich, I placed the batting on top of the back panel, and the top panel of circles on top of the batting. Then I made long continuous lines of pins from one edge to the other, around the circles.
These pin lines mark the position of the quilting lines I will later stitch on the machine. There is no order to the lines since I was going for a free-flowing effect. I think of the lines as eddies of current moving around circular stones. This is what it looked like after pinning.
Machine stitch along the pinned lines, removing the pins as you go. Don't sweat it if you don't follow the pins exactly. I improvised as I went along, making sure that they were evenly distributed and all the edges had sufficient lines of stitching so that the batting is secure. I love the finished effect of the quilted lines flowing around the circles.
The final step is to bind the quilt. I used pre-made quilt binding, machine stitched it on one side and slip stitched it on the back side. There are good instructions on the Purlbee blog here. (Coincidentally, Purlbee put up a post today about a Circular Applique Mini Quilt using their Liberty of London Tana Lawn fabrics.)
Here's my first quilt all done! I am one proud mama.
My good friend, Mel, threw a birthday party for her sweet little girl a few weekends ago, which gave me the occasion to make these letter pillows that I'd dreamed up a while back but hadn't gotten round to doing.
The birthday girl has the initial C, but her older brother's name begins with M. So, I thought why not bring them both pillows since in my house, good things always come in twos.
The pillows have envelope backs (see my post on how to make an envelope closure), and fusible-web applique letters. You can put a whole set together for a nursery, use them to spell a word or just do special letters or dates. Lots of possibilities here - so I daresay I'll be making more of these soon.
But on the subject of birthday parties - check out this party favor that Mel put together.
She saved these baby food jars for months and turned them into favors by adding nifty personalized labels. I totally loved how she found such good use out of an ordinary thing but more so that she was planning and thinking of celebrating her daughter's big day, every day that she would put one of these away. What better way is there to repurpose what you've got than by sharing your efforts with loved ones.
My new year's resolution for 2011 is to make what I would otherwise buy - which led me to sew this pillow and blanket set for Eden, when her preschool teacher said she needed extra bedding for naptime.
Its a cute little fleece set, patterned with firetrucks, ambulances and police cars (which she helped pick out). But after it was finished, she refused to bring it to school. (You see a pattern here re: my post about the slippers.)
So this has gone to little brother Eliot, who is much more accommodating when it comes to wearing or using the things his mother makes.
This was a really simple set to sew up, and experienced readers will not need any instructions here. But since I've benefited from very basic tutorials - I thought, why not write one anyway for all my friends out there who don't fancy themselves crafty. Children's bedding tends to be expensive, so if you're inclined to make your own - read on, its a cinch.
Materials
Fleece - 1.5 yards (adjust for bigger or smaller sets)
13 inch pillow insert (Ikea carries a really inexpensive one)
Sewing machine & coordinating thread
Ball-point sewing machine needle (suitable for knit fabrics)
Disappearing ink fabric or chalk marker
Instructions
Lay out your fleece fabric on your cutting surface wrong side up, measure and mark a rectangle 36" x 48" for the blanket . With the remaining fabric, mark a rectangle 14" x (14" + 6") for the pillow. The extra 6" will form the overlap for the envelope closure. My pillow insert is 13" square, so the 14" width gives me a half inch seam allowance on each side. If you want a poofier pillow, make the rectangle 13" x (13" + 6"), and it will give the pillow a nice squeeze.
Make sure you mark both rectangles before you start cutting. Since mine was a patterned fleece, and I wanted to make sure I got a couple of the firetruck/car images intact on the front of the pillow, I didn't end up with the most efficient/fabric saving layout.
For the Pillow
With the wrong side of the fabric up, fold in a half inch seam on each of the short sides of the rectangle, pin and stitch. If you feel comfortable, you can start stitching and fold as you go along.
When you are done sewing the seams on the two short sides, fold the fabric over so that it overlaps as shown in the photo above. The wrong side should be facing you, and the distance from the top to the bottom folded edges should measure 13". Secure the side edges with pins.
You can flip open the flap, to check that you have it folded correctly. Take the time to make sure that your pillow front will show the pattern that you want to end up with. The pillow front is the bottom most layer in the photo above. You can adjust the location of the flap to ensure this.
Stitch a half inch seam on the sides, (where you have secured with pins). You should end up with a seam as shown in the photo above.
Flip the pillow inside out. You now have a finished pillow cover, with an overlapping flap as shown (otherwise known as an envelope closure). That overlap is what allows you to insert your pillow and keep it secure without zippers, buttons and what-not so little fingers don't get into trouble.
Flip it over to see the pillow front. If you've checked on the position of your pattern in the previous step, you should end up with a happy outcome - voila! One intact firetruck and ambulance! Stuff your insert and you're done!
For the Blanket
This is the simplest part - just fold in a half inch seam on all 4 sides and stitch. And there you have it - your finished blanket and pillow set all ready to keep your little one snuggly and warm.
Valentine's Day is just round the corner so I thought I would make a lovebirds themed onesie for Eden, who is always running out of play clothes. While I was at it, I put together a simple tutorial for anyone who would like to try making this. A hand-crafted onesie makes a sweet, personal gift for a birthday girl or new baby.
Materials
1 blank onesie or t-shirt
3 fabric scraps in red, pink and/or red-pink combo
Tear-away stabilizer (eg. Sulky iron-on or self-adhesive)
Sewing machine needle for knit fabrics
Sewing machine with satin foot
Sewing machine thread in red
Hand-sewing needle
Embroidery floss in red
The first thing I do is to gather my scraps and put them together on the table to see if the colors will work well together. Since this is a Valentine's Day design, I decided to go with a red bird and a pink bird, with some other accent fabric for the hearts.
Trace the outline of the birds on a piece of iron-on fusible web. (You will draw on the paper side of the web, the other side is the bumpy side which contains the heat-activated adhesive.) Remember that you will be fusing onto the back side of the fabric, and then turning it over, so your applique cut-out will be a mirror image of your drawing.
Cut out the shapes of the birds from the fusible web, leaving a quarter inch surround. Place the cut-out shapes of fusible web onto the back side of the fabric. I like to do this over a light-table or hold the pieces up against the light in order to make sure the outline encompasses parts of the print I want to capture.
Set a hot iron (no steam) on top of the two pieces, and fuse the drawing onto the back of the fabric. Carefully cut out the shape of the bird, along the traced lines. Do the same for the second bird.
Arrange the two birds on your onesie, making sure you mark their position with a pin. In this case, I wanted the two beaks to be close to touching.
Peel the paper backing off the birds, and using a hot iron with a press cloth, fuse one bird at a time. This is to make sure you have one fused in place so that you can reposition the second bird if you need to.
At this point, I decided to add some hearts, so I found a pair of Eden's old shorts with a cute polka-dotted print and cut a few out in various sizes. I played around until I was happy with the composition and pinned the hearts in place. The top three hearts will be fused onto the shirt, as I did the birds. The bottom largest heart, I reserved for doing the raw-edged applique.
Turn the shirt inside out and apply the stabilizer (either iron-on or self adhesive) onto the back of your designs. Make sure that the stabilizer is a large enough piece so that it provides coverage under both the birds and the hearts. Flip the shirt back right side out and prepare to sew.
I have a very basic sewing machine, so I used a tight zig-zag stitch. If your machine has a satin stitch or other embroidery functions, you may want to use a fancier stitch. I love the scribbly effect of a zig-zag because it has that hand-made look, so don't sweat it if you don't stay perfectly on the edge of your shapes. A little bit of a wiggle here and there actually gives it a personal touch. Go slow and always pivot with the needle down.
When you are done, flip over to the back side and carefully tear away the excess stabilizer until you end up with something like this.
Fuse and zig-zag stitch the remaining heart onto a scrap of jersey knit fabric using the same method as described above. In this case, I'm using a scrap of heather grey jersey that matches the blank onesie.
You'll want to make sure the scrap is large enough so that you can securely pin around it. Thread a hand-sewing needle with three strands of embroidery floss, and stitch around the heart with a tight running stitch. You may use an embroidery hoop to help you, but I just sew it with the pins in place.
Keep the stitches even and close together. Hide the knots behind the heart.
When you're done, carefully trim leaving an even allowance around the stitches. Because of the knitted material, the edges won't fray and with washing, they will eventually curl giving it a quirkly, hand-made character.
My New Year's resolution for 2011 is to make what I would otherwise buy. Granted of course, that I can make a comparable, functional and reasonable version of that particular thing.
I daresay I will be screaming for a shopping binge after a couple of months, but that's what's fun about making a new year's resolution. Its something well-intentioned, not completely thought through, with somewhat dubious chances of success.
For example, take this pair of slippers I made for Eden from a repurposed wool sweater. Its a pattern from Betz White's lovely book, Sewing Green (note: it needed a fair bit of doctoring to get it to a child's size). I found one of my "so-very-yesterday" sweaters, felted it in a hot wash cycle, sewed it up and voila!
But all the good intention in the world won't get those slippers onto my toddler's feet. Eden took her first look at them, and screamed, "No!" and ran in the opposite direction.
Its completely baffling because those are her favorite colors, she loves all kinds of booties/boots, and its soft, cozy and so darn cute. See what I mean about new year's resolutions? You can make them, but then life intervenes.
When my sister and I were little, we badly wanted a Christmas tree. But we lived in a part of the world where it was impossible for snow and the only kind of tree you could get was the plastic variety that came in a box. It never occurred to us to pester our parents because of the way we were brought up, so we set out to raise money to buy a tree ourselves.
We poured our energy into building a Christmas Tree Fund, making sure we had plenty of time to earn what seemed like a monumental sum of money. We did extra chores, (though it was a foreign concept to our parents to have to pay us), and we sold tickets to a musical we produced with an entire cast of toys.
The musical never took off, since my sister and I were the only mobile, talking members of the cast and we were terribly short-handed. I forget what happened, but I think my parents finally took pity on us and got us a tree.
It didn't matter that it was a bright green, spindly thing and that we didn't have the best ornaments. To us, it represented choirs of angels, dancing snowflakes, gingerbread houses, stockings by the fireplace, mistletoe and lots of merriment. We never got the first five things on that list but we did have some good times.
Over time, we grew up and went on to prefer hanging out with friends over Christmas. I got old enough to look forward to being entertained with fabulous parties, delectable food and great wine. None of that homespun stuff for me now - it was all glitter, sparkles and wearing black.
More time passed, I got married and had children of my own. All of a sudden, I felt that I needed to care about "doing Christmas" right for my kids. Well, it goes without saying that if only I knew how it was supposed to be done, I could reproduce all the necessary accoutrement to accompany the absolute best Christmas so that my children would have these unassailable memories of happy childhood holidays to sustain them through all of life's unhappier times.
The first years of my married life, we got a real tree, lit it up, made Christmas dinner, wrapped presents, and hung stockings. After my first child was born, we got a tree but left it bare. I bought and wrapped presents but didn't put up the stockings. Christmas morning was a flurry of trying to photograph my daughter opening presents but all she really wanted to do was to play with the giftwrap, and all I really wanted to do was to sit back and soak in the scene. However, there was special outfits to be worn and pictures with this person or other to be taken to "commemorate" the event. When I balked, I was told that it was "for the sake of the children".
This Christmas, we have two kids and no tree. No ornaments, no stockings, no special outfits and only the minimum of gifts. In many ways, I wish I could go back to capture all the promise of Christmas from when I was a child, cradle it in my arms and give it to my children. But I realize now that the magic is not found in the tree, the lights, the stockings, the cookies, the feasting, the lot of presents etc. Because in truth, I didn't get most of those things. It was the promise that mattered, not the stuff.
I believe that the point of all the work going into "doing Christmas" right would have been to be able to say to your child someday, "See, this is what your first (second, third) Christmas was like when you were little and here is proof that I love you." But if its love we're after, then we truly don't need all this stuff, especially when they are too young to care about it.
I hope my children know that I love them and that one day, they'll be old enough to maybe want the gingerbread house, the stockings and the tree. I know that if they were to ever stage a musical of toys, I will sit through every take and every scene. I will make sure that they know that they are cherished beyond measure, and that while they may not be able to earn their way into what they want so dearly, they may still get it, while its within my power to give.
And when they get it, they will also learn what it's like to hold on to the promise of something yet to be fulfilled, while reality falls short.
My baby boy turned one month old in May, and as customary for the Chinese side of the family, we made hard-boiled eggs and dyed them red to celebrate. Well, except that my husband doesn't eat eggs and my two year old doesn't eat much, so we couldn't get away with making too many.
So I came up with the idea of making little yarn eggs that make great giveaways and don't need refrigeration. Put a pair of them in these little wood boxes, dress them up with personalized tags with your baby's initials and date of birth, and they are ready for your party!
I used shipping labels from the office supplies store and created tags with a set of vintage stamps I found at a garage sale. Brown ink makes for a beautifully aged, and "not too precious" look.
This wood boxes were found in the unfinished wood crafts section of Michael's. Stuff the boxes with some straw and they make a great home for your little eggs.
Glue a ribbon band around the box, and finish off with your favorite knot. I stamped these light-blue Martha Stewart tags to label the boxes, but you can use stickers or any other tags you like.



 and a back panel of the same fleece. There are many great instructions about how to do this on other blogs - I don't know if I did it the right way. But I just put my top panel with the circles directly on top of the batting material and cut around it. I did the same with the back panel.


 , machine stitched it on one side and slip stitched it on the back side. There are good instructions on the Purlbee blog


 is just round the corner so I thought I would make a
  themed onesie for Eden, who is always running out of play clothes. While I was at it, I put together a simple tutorial for anyone who would like to try making this. A hand-crafted onesie makes a sweet, personal gift for a birthday girl or new baby.
 )
) or self-adhesive)


 to help you, but I just sew it with the pins in place.


